
Framer Rough-In WRB Tie-Ins: The Hidden Layer That Keeps Water Out of Alberta Homes
Framer rough-in tie-ins are pieces of weather resistant barrier (WRB) that the framing crew installs while the house is still being framed, in spots that become impossible to reach once the structure is closed in. The cladding contractor later laps the main housewrap into these pre-placed strips, creating one continuous drainage path that carries water down and out of the wall.
When a framing contractor in Calgary skips these tie-ins, wind-driven rain gets behind the siding with no way back out, and the result is the rotted sheathing and mouldy insulation that show up years later as expensive repairs. This guide explains rough-in tie-ins in plain language for homeowners, builders and property owners in Alberta, based on the National Building Code – Alberta Edition (NBC(AE) Section 9.27.3) requirements for the second plane of protection.
What Is a Framer Rough-In Tie-In?
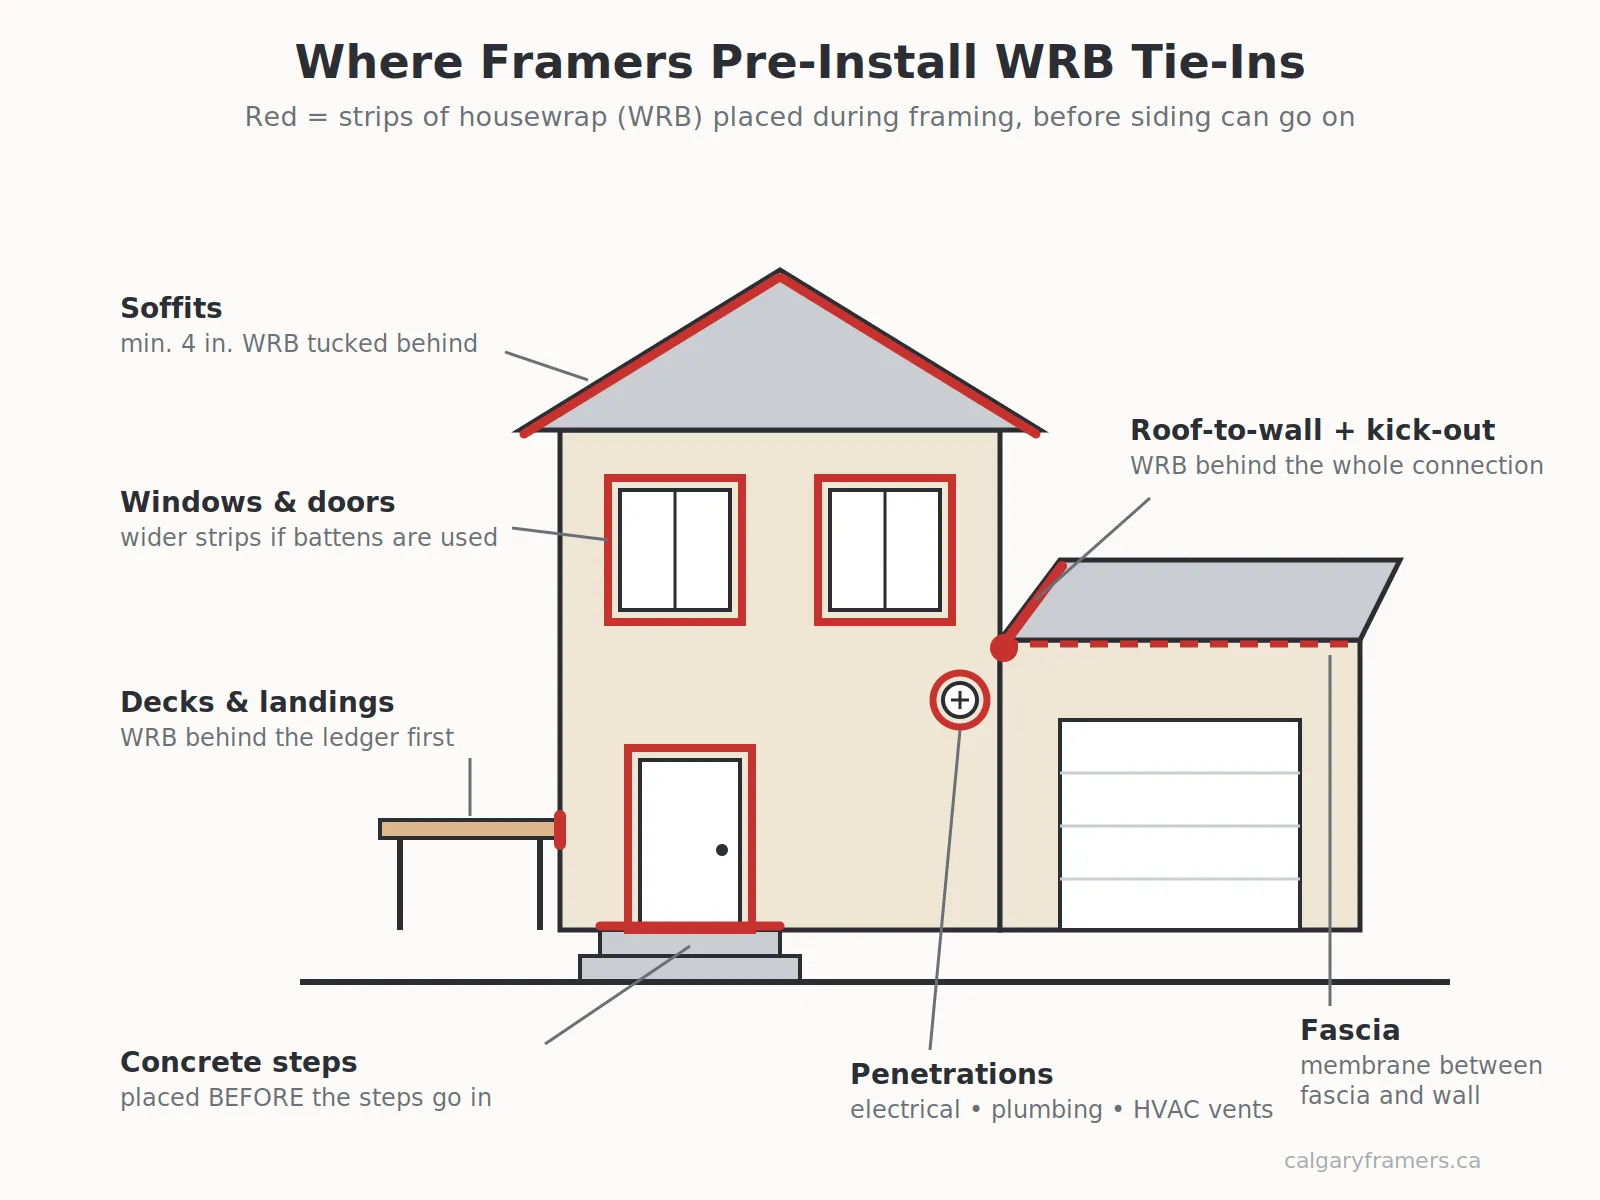
A framer rough-in tie-in is a strip of WRB placed by the framer behind components that get fastened directly to the wall before the main housewrap goes on. Roof lines, fascia boards, concrete steps, insulation stops and window openings are all attached while the walls are still open. Once they are in place, nobody can slide housewrap behind them, so the framer installs those pieces first, and the cladding contractor ties into them later.
The lower edges of these tie-in strips are deliberately not stapled to the wall. A loose lower edge lets the cladding contractor lift the strip and lap it over the next layer of housewrap below it, keeping the shingle-lap sequence correct.
What Is a WRB (Weather Resistant Barrier)?
A WRB is the water-shedding layer behind your siding, most commonly a synthetic housewrap, and historically tar paper. Siding and flashings are not waterproof; the building code assumes some water will get past them. The WRB is the second plane of protection that catches that water and drains it back outside. Under NBC(AE) 9.27.3, this second plane of protection applies to walls and soffits, not just walls.
In Alberta, non-absorbent synthetic housewrap outperforms tar paper for tie-ins because it survives wind exposure far better, and the tie-in strips often sit exposed for weeks while the rest of the build catches up.
Why Tie-Ins Go In During Framing, Not After
Because the spots they protect stop being open surfaces the moment framing is finished.
After the roof is sheeted, the fascia is on and the concrete steps are poured against the wall, there is physically no access to place a membrane behind them. Every tie-in the framer misses becomes either a permanent weak point or a costly retrofit that means removing finished work.
A completed frame that is ready for cladding should already have WRB sitting behind the attachment points for electrical, plumbing, HVAC vents, roof connections and steps.
The practical test: if you can still get a hand behind it, it is not a tie-in location. If you cannot, the wrap had to be there first.
Where the Framer Installs WRB Tie-Ins
Every location where something covers the wall before the main housewrap arrives.
- Behind insulation stops The baffles at the top of the wall that keep insulation out of the soffit vent
- Around window and door openings Made wider where battens will be used
- Behind concrete steps Placed before the steps are poured or set
- Behind roof attachments Wherever a lower roof dies into a wall
- Behind fascia connections Membrane between the fascia and the wall
- At penetrations Electrical, plumbing and HVAC, cut to drain back over the lower WRB
- At stairs, landings and decks Every point where a structure connects to the wall
- Between sheathing joints As through-wall flashing on taller walls
Every one of these follows the same rule: the tie-in must direct water back over the lower layer of WRB, never behind it.
How the Shingle-Lap Rule Works
Water always runs downhill, so every layer on the wall must overlap the layer below it, exactly like roof shingles.
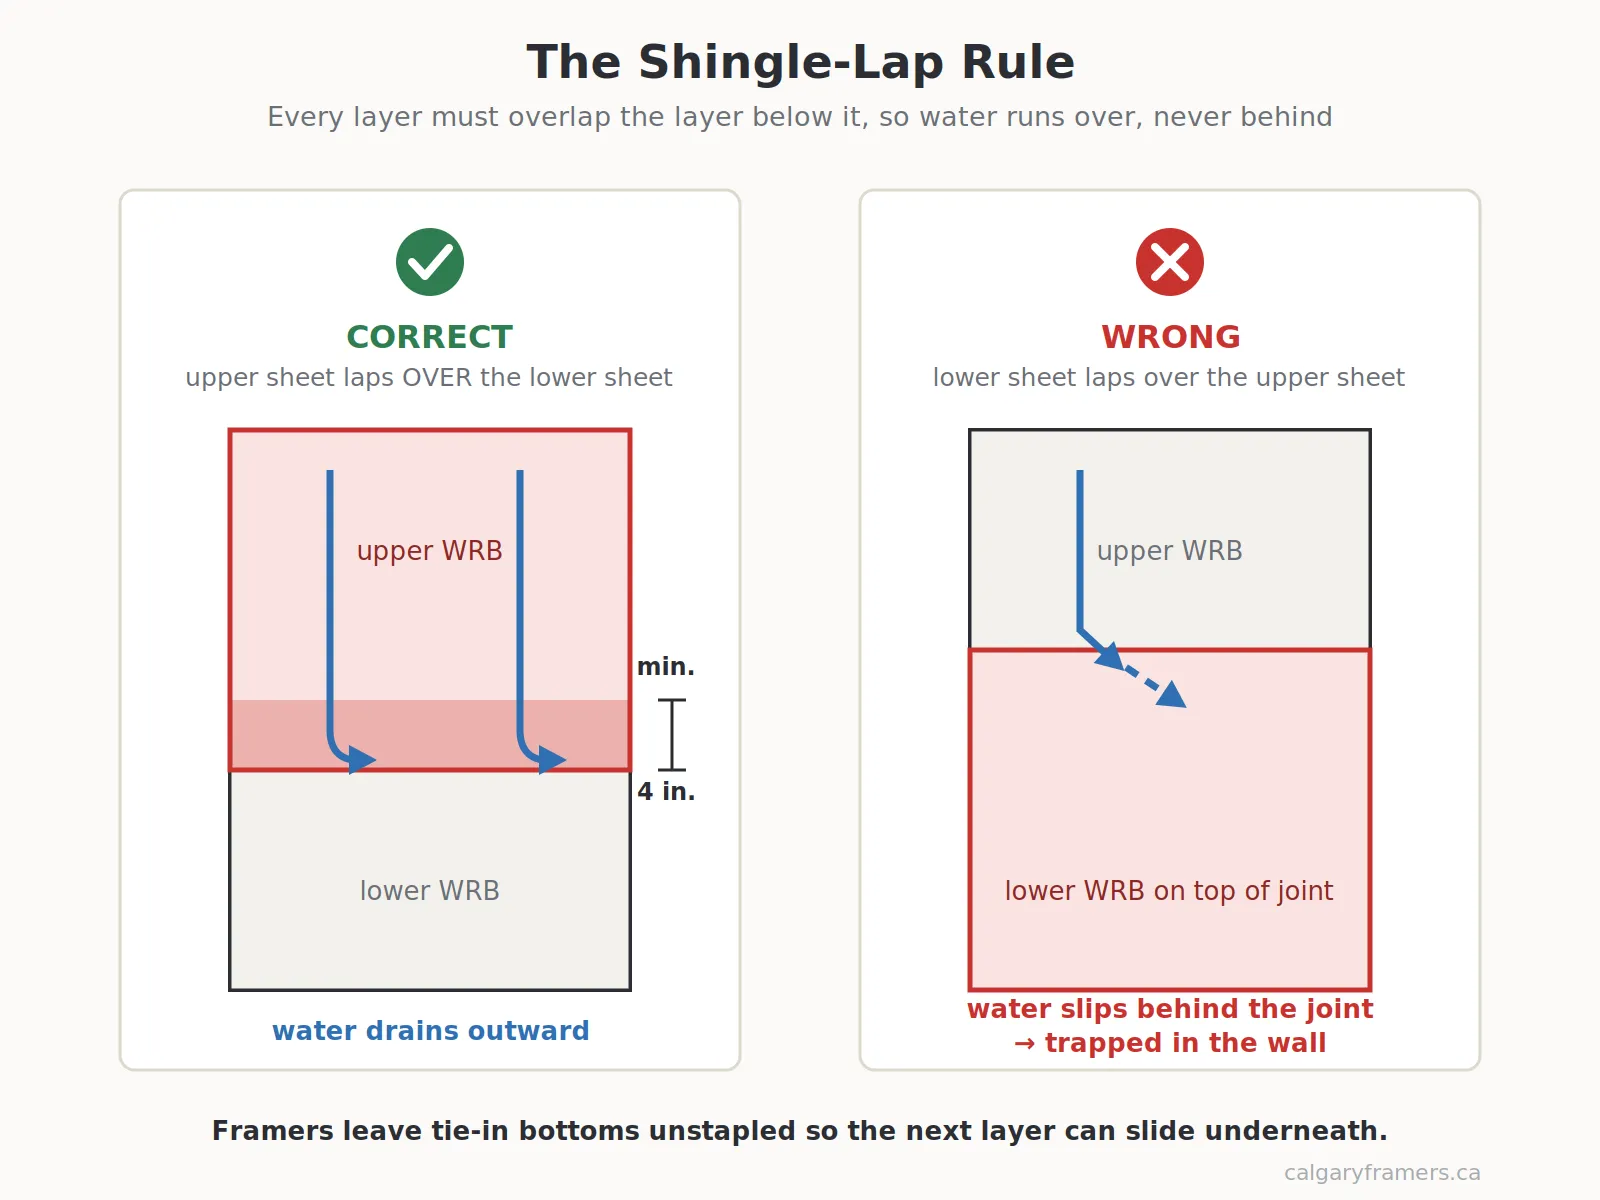
Upper WRB laps over lower WRB with a minimum 4-inch overlap. Any joint where a lower layer sits over an upper layer funnels water into the wall instead of out of it.
This is why the framer leaves tie-in bottoms unstapled: the siding crew lifts them, slides the main wrap underneath, and the lap lands in the correct order.
How WRB Is Installed Behind Soffits
Soffits are vented by design, and in a windy Alberta storm, rain gets pushed through those vents and down the wall face.
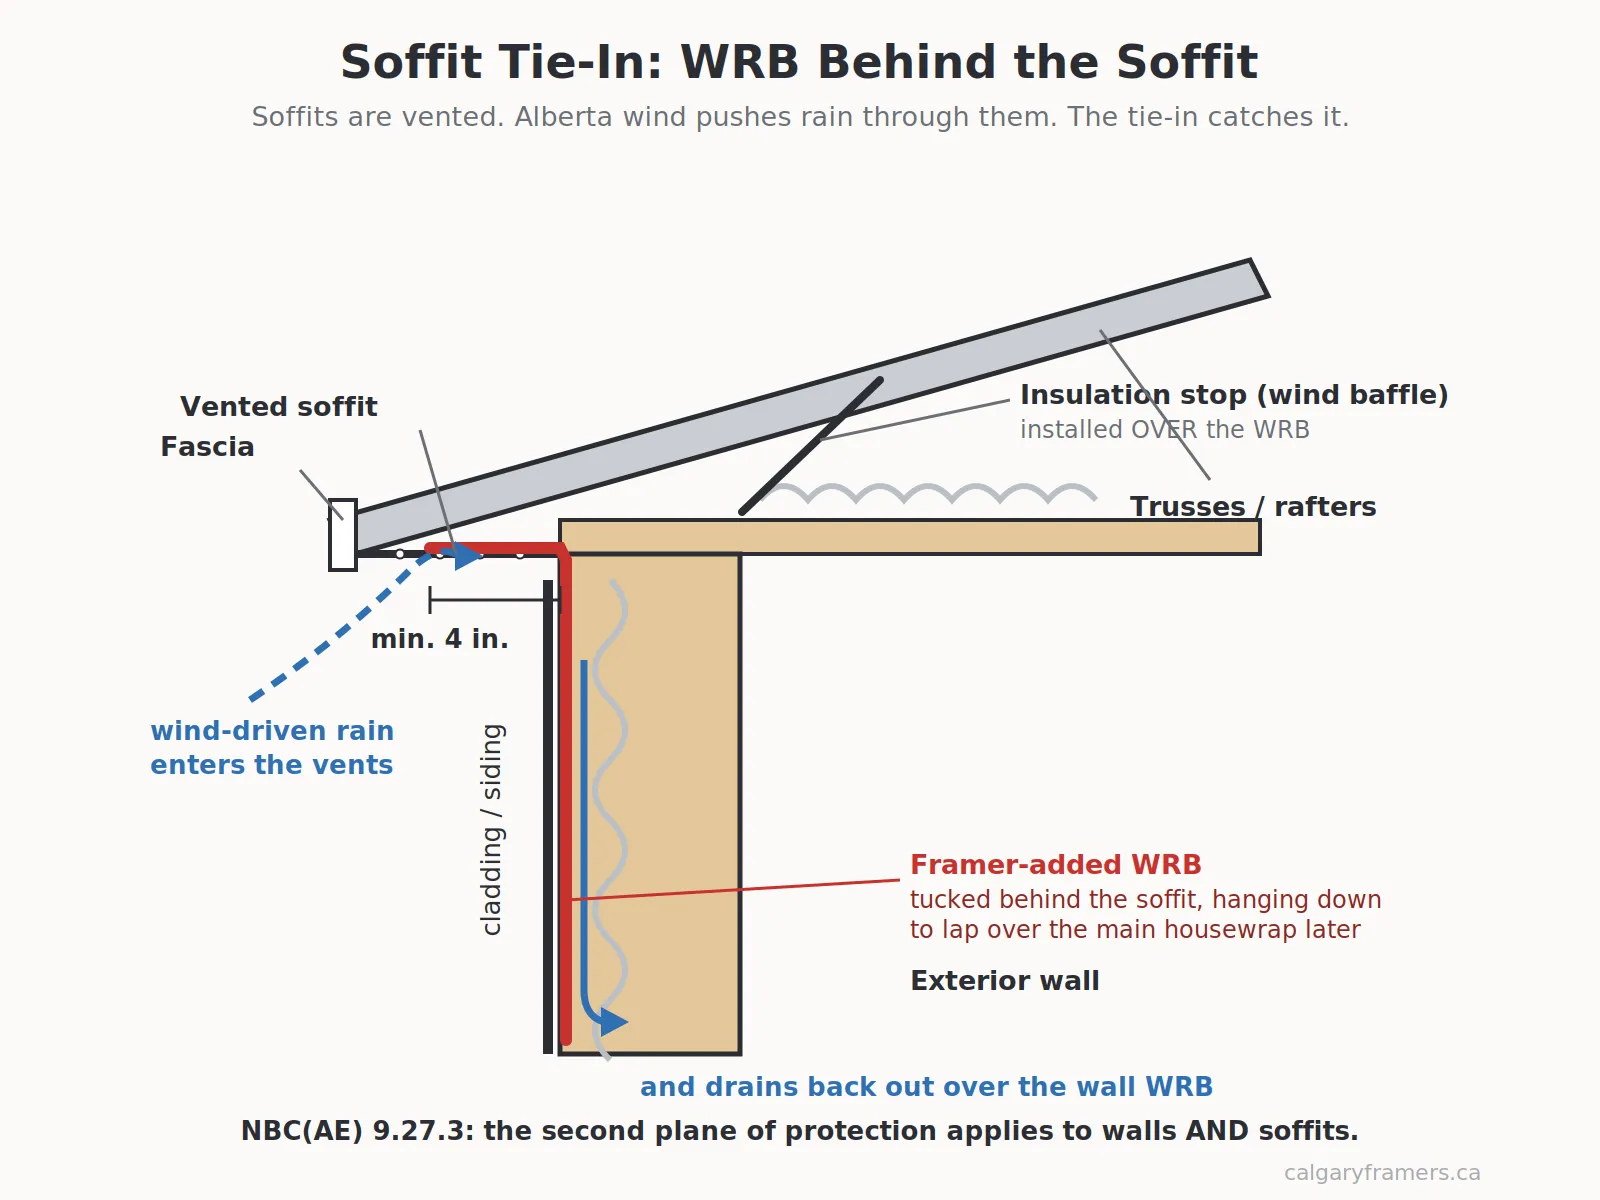
The framer tucks a minimum 4 inches of WRB behind the soffit line and leaves enough hanging to later extend up past the soffit, behind both the cladding and the main WRB. Without the tie-in, the water blown through those vents lands directly on bare sheathing at the very top of the wall.
For high-exposure and high-wind locations, common across the Calgary area, the manual practice is to extend that soffit WRB further and tie it through to the interior air/vapour barrier, with insulation stops installed over the WRB, not under it.
How a Roof Should Connect to a Wall
A garage roof against a two-storey wall, an entry roof, a dormer: anywhere a roof dies into a wall, the membrane goes in before the roof is built.
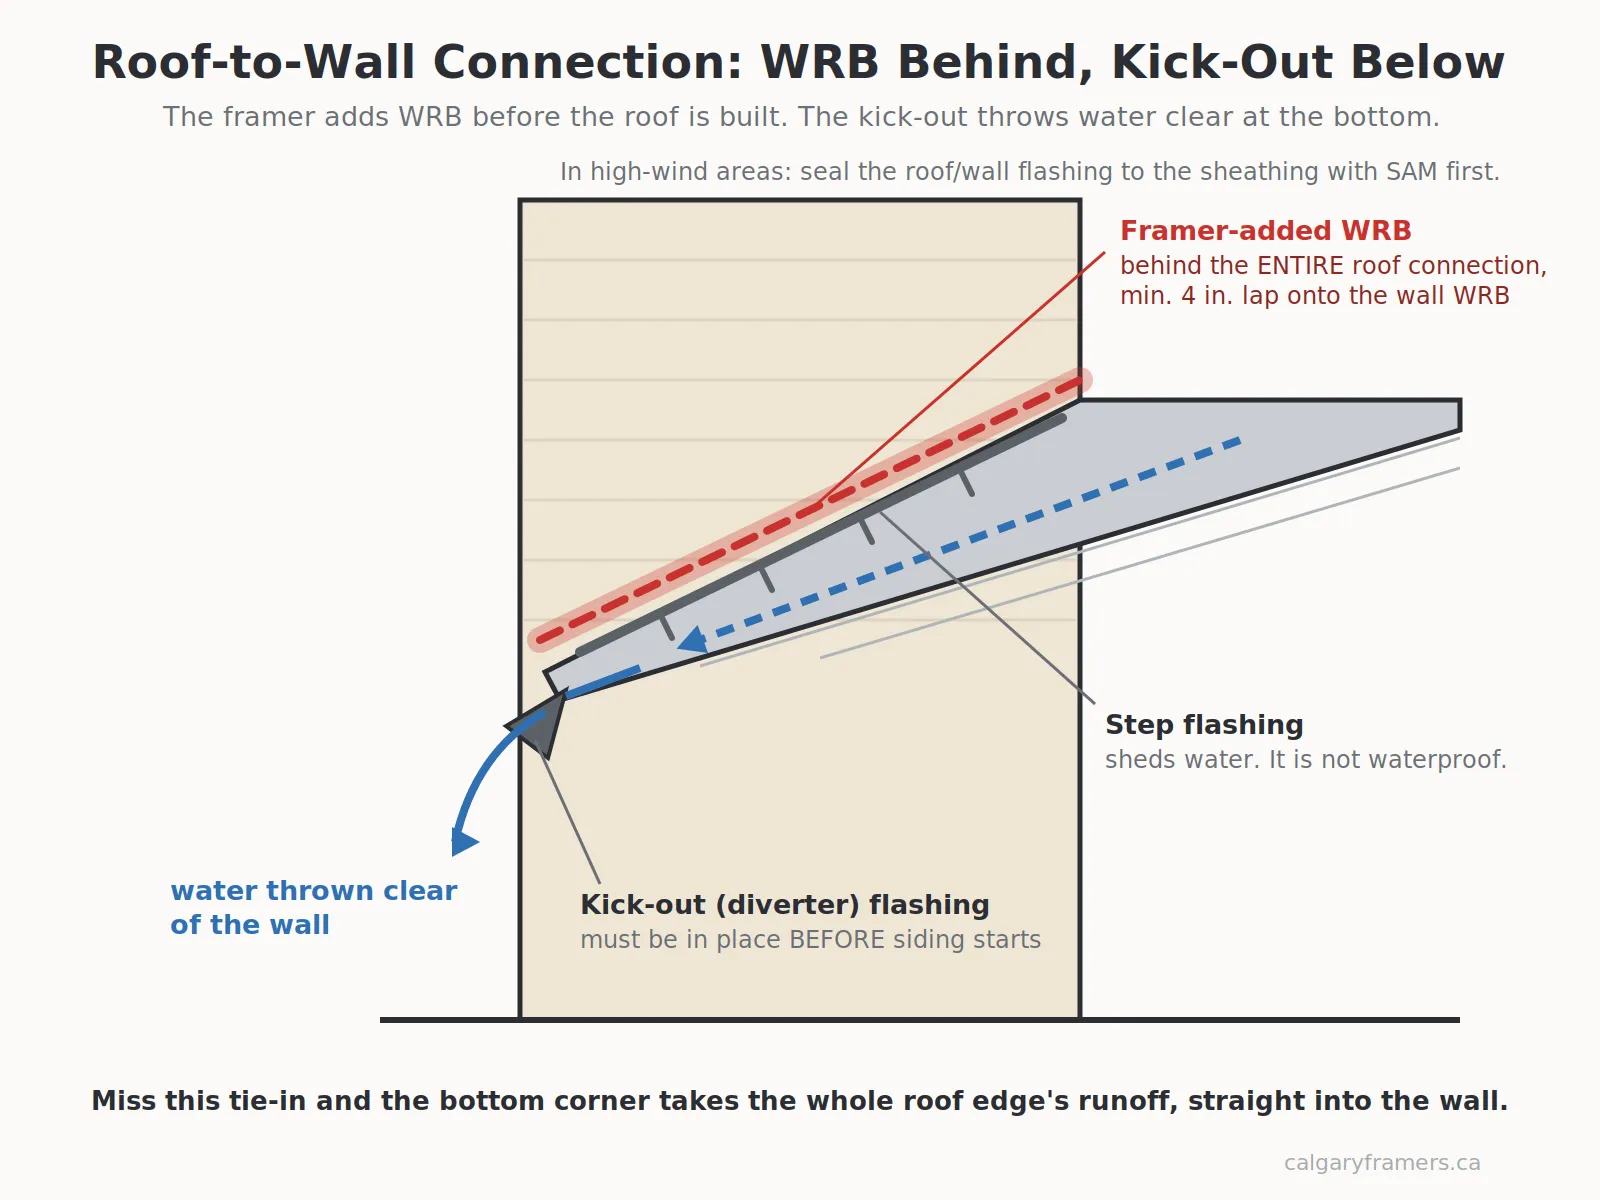
The framer must place WRB between the fascia and the wall before the roof is built. That membrane extends behind the complete roof connection and creates a drainage lap for the cladding contractor to tie into below.
The finished assembly stacks like this, from the wall out: framer-added WRB, then step flashing, then kick-out (diverter) flashing at the bottom corner, then cladding. Any moisture that sneaks behind the step flashing drains down the WRB and exits at the kick-out. In high-wind locations, sealing the roof/wall flashing to the sheathing with a self-adhered membrane (SAM) first adds insurance. Excess WRB above the roofline gets cut off. It serves no drainage purpose up there.
What Kick-Out Flashing Is and Why It Matters
Kick-out (diverter) flashing is the small angled piece at the bottom corner of a roof-to-wall connection that throws water away from the wall instead of letting it run down the siding. It must be in place before the cladding contractor starts work. The bottom corner of a roof-to-wall joint concentrates the runoff of the entire roof edge into one spot. Miss it, and that spot takes gallons of water per rainfall, year after year.
What Happens When a Tie-In Is Missed
The wall rots from the inside, and it usually is not discovered until the damage is severe. Without WRB behind the fascia/wall connection, moisture enters the wall assembly and damages sheathing, studs and insulation. The risk is highest on tall structures and high-exposure sites. Worse, the building envelope is less airtight at these junctions, and wind-driven rain can actually be sucked into the wall by air-pressure differences.
That is why the practice is to extend housewrap 8 to 10 inches beyond the framing at these connections, enough material for the next trade to make a proper tie-in. Missed tie-ins are one of the most common root causes behind the structural repairs we are called in to do on Calgary homes: by the time staining or soft spots show up inside, the sheathing behind the cladding has often been wet for years.
The Rule for Windows Above a Garage Roof
A sill bib tied under the window, and 6 inches of clearance between the window and the roof surface.
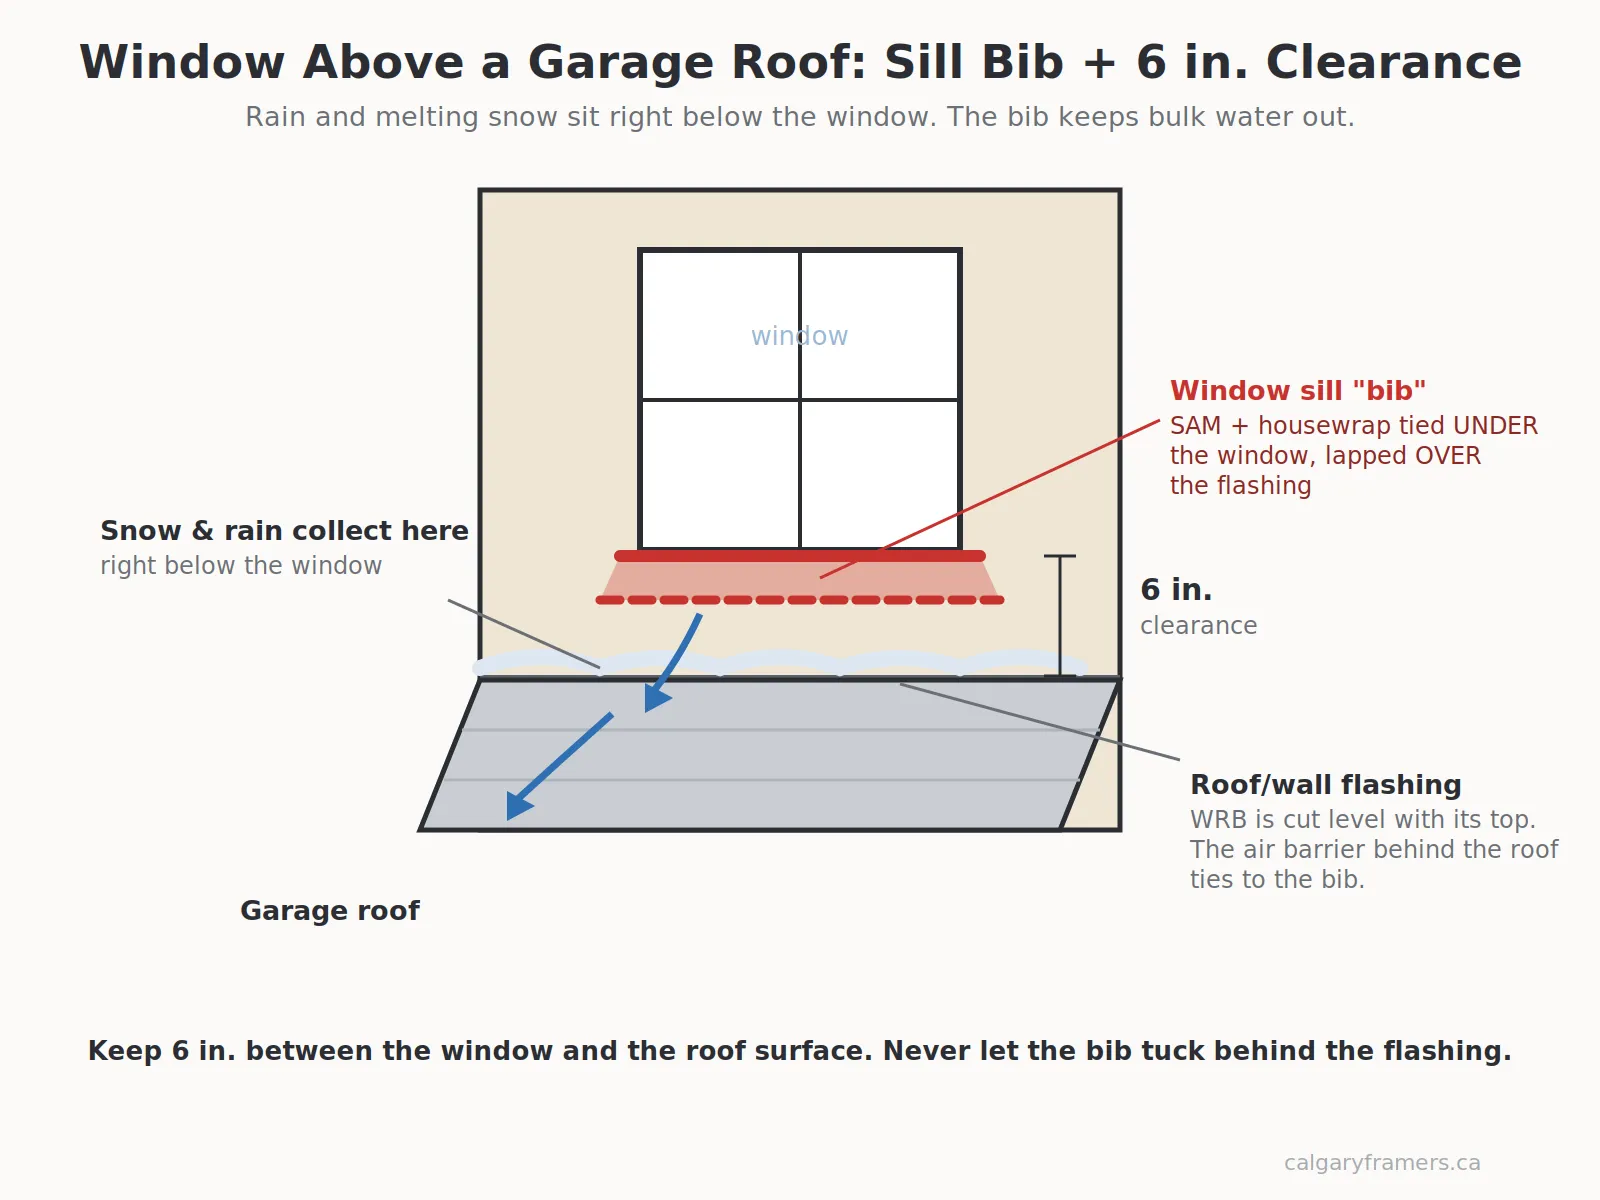
On garage builds with living space above, the air barrier behind the roof must run under the window’s lower sill bib, a piece of self-adhered membrane with housewrap extended over the roof/wall flashing, so bulk water can never enter under the window.
The WRB gets cut level with the top of the roof flashing, and snow sitting on the garage roof stays below the window frame.
What Build-Over Walls Are and How They Drain
Build-over walls are secondary framed walls, usually 2x4 or 2x6 sheathed with OSB, added onto the face of the main wall to create depth around windows or architectural features. They are common on modern home additions and front elevations. Because they trap a second wall assembly over the first, their bottom plate is ripped down about ½ inch so incidental moisture can drain out instead of ponding behind the sheathing. Sill, head and jamb details on windows inside these thick walls need the same water out, not in treatment.
Decks, Steps and Landings Attached to the House
Same principle, same timing: the WRB goes behind the connection before the deck ledger or the concrete steps are installed.
Stairs, landings and deck connections are second-plane locations. The tie-in must drain water back over the WRB below it. Concrete steps are the least forgiving: once poured or set against the house, the wall behind them is sealed off forever.
A related framer detail for front entries: posts should never sit directly on concrete steps. Hidden pressure-treated support blocks (two 1½ inch PWF plates with a rebar pin and adhesive) raise the post and leave a drainage space, with flashing kept a minimum of ½ inch off the concrete and the trim spaced per manufacturer requirements. That protects the post from wicking moisture while still providing lateral support.
What to Inspect Before the Siding Goes On
Four connections deserve a visual check on every build, because they fail most often.
- Garage roof to wall WRB behind the whole connection, step flashing, kick-out at the bottom corner
- Entry roof to wall Same detail, same failure point, usually right above the front door
- Steps and deck to wall Membrane behind the ledger or the steps, placed before they went in
- Flashing connections Sufficient membrane behind every flashing, because flashings shed water, they do not waterproof
At each one, confirm the WRB is placed correctly, the flashings are installed, and there is sufficient membrane behind every flashing. The guiding principle for the whole envelope is simple: water will get in; the assembly must let more water out than gets in.
Who Is Responsible: the Framer or the Cladding Contractor?
Both, in sequence. The framer pre-installs the tie-in strips at every inaccessible location while the structure is open; the cladding contractor lifts, laps and integrates the main WRB into them afterward. The hand-off only works if the framer thought ahead. Some builders go further and have the framer wrap the entire structure during framing, which keeps the build dry through Alberta weather, as long as materials fastened through that WRB still drain correctly and nothing traps moisture behind non-absorbent layers.
Why This Matters When Choosing a Framing Contractor in Calgary
Rough-in tie-ins are invisible on the finished house, which is exactly why they separate careful framers from fast ones. Two frames can look identical the day the siding goes on; only one of them has a continuous drainage path behind every roof line, step and window. Calgary Framers Inc builds these tie-ins into every frame as standard practice, on new builds, garages, additions and decks alike.
Planning a project, or worried an existing wall was not detailed right? Contact us and we will tell you what is behind your cladding and what it needs. Call (587) 355-2799, 7am–7pm, 7 days.
Worried about what is behind your cladding?
We frame houses, garages, additions and decks across Calgary and area, with the rough-in tie-ins detailed as standard. Free on-site assessment, fixed-scope written quote.
Free on-site assessment · Fixed-scope written quote · 7:00 a.m. – 7:00 p.m., seven days a week
Where This Detail Shows Up
Every one of these connects to a wall, and every one of them needs the wrap behind it before it goes on.
-
Garage Builders
Detached and attached garages, garage suites and packages. Slab to shingles, engineered trusses, permits handled.
Garage builders in Calgary -
Deck Builders
New decks, elevated and walkout builds, covered decks and structural deck repair. Piles below frost, flashed ledgers, code-height guards.
Deck builders in Calgary -
Fence Builders
Wood, cedar, vinyl and chain link, built to Land Use Bylaw heights with posts set below frost depth.
Fence builders in Calgary -
Basement Development
Framing to finished basement, including legal secondary suites, egress windows and beam work.
Basement development in Calgary -
Home Additions
Rear additions, second storeys, bump-outs and garage conversions, foundation through roof tie-in.
Home additions in Calgary -
Structural Repairs
Fire, water and impact damage rebuilds, load-bearing wall removal, beam and joist repair.
Structural repairs in Calgary